
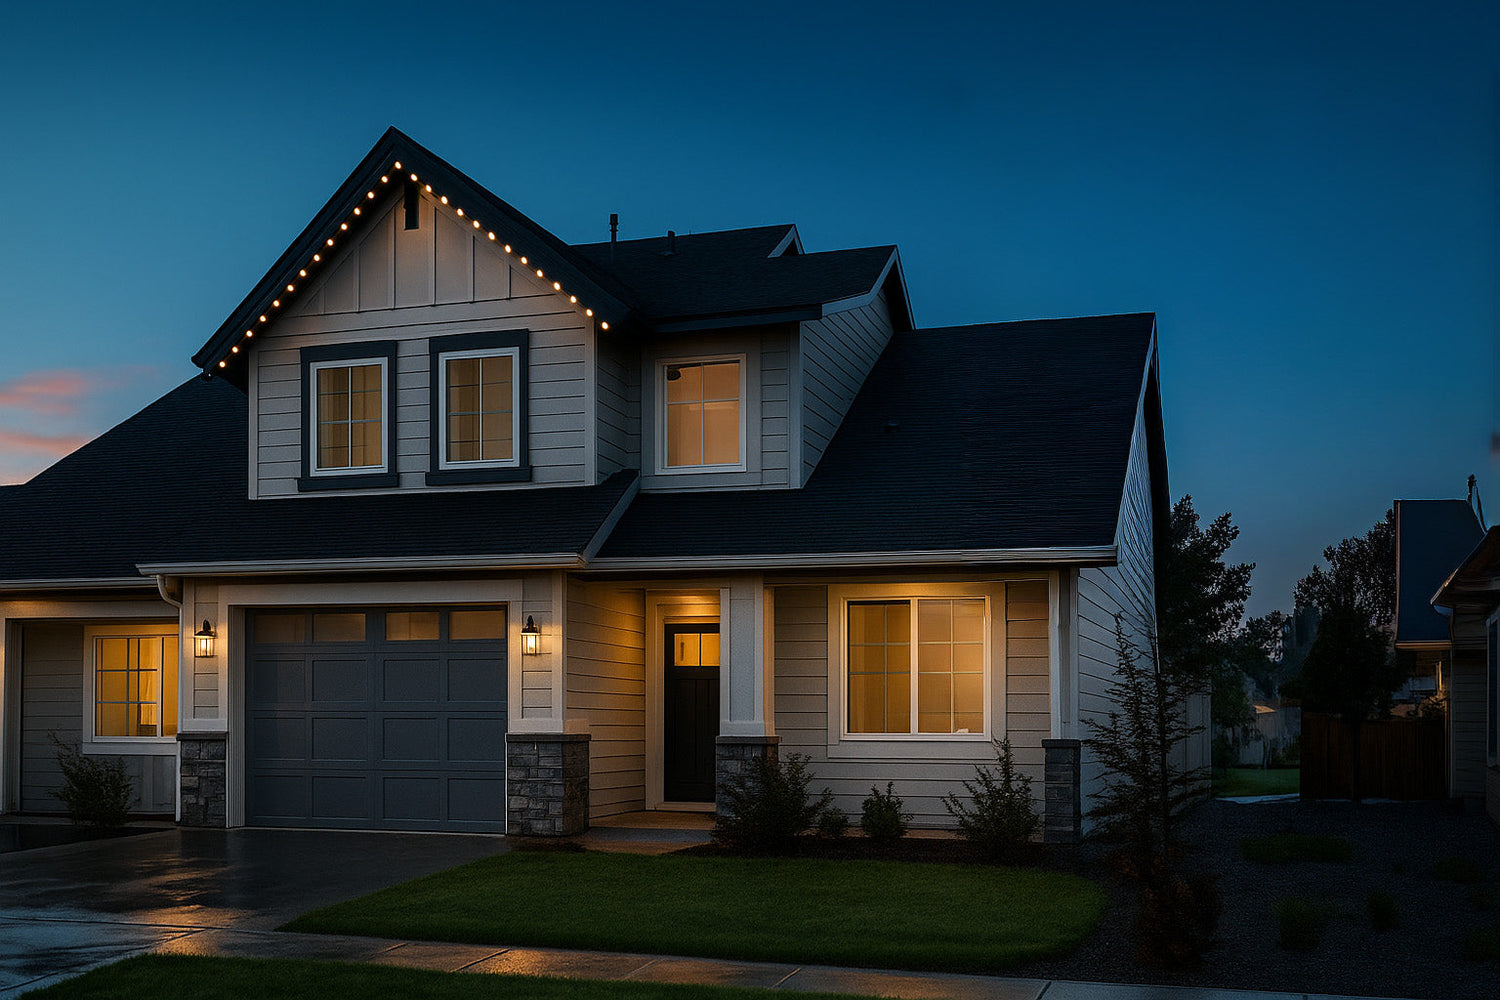
Save $3,000-$8,000 by Installing Your Own Permanent Christmas Lights in Just 4-6 Hours
If you're tired of the annual ritual of untangling Christmas lights, climbing icy ladders, and dealing with burnt-out bulbs, permanent Christmas lights are the solution you've been looking for. But when professional installation quotes come in at $4,000-$13,000, many homeowners assume this convenience is out of reach.
Here's the secret the installation companies don't want you to know: installing permanent Christmas lights yourself is easier than assembling IKEA furniture. With the right system and this guide, you can have professional-quality permanent lights installed in a single afternoon for a fraction of the cost.
Table of Contents
Why Choose DIY Installation?
The Real Cost Difference
Let's talk numbers that matter to your wallet:
| Installation Type | Cost per Linear Foot | 150-Foot Home | 300-Foot Home |
|---|---|---|---|
| Professional Install | $20-$40 | $3,000-$6,000 | $6,000-$12,000 |
| DIY with AmbientLights | $8-$15 | $1,200-$2,250 | $2,400-$4,500 |
| Your Savings | $12-$25/ft | $1,800-$3,750 | $3,600-$7,500 |
Time Investment
- Professional scheduling: 2-4 weeks wait time during busy season
- DIY installation: 4-6 hours for average home (one weekend afternoon)
Additional Benefits
- Complete control over placement and design
- Understanding of your system for easy troubleshooting
- No markup on materials
- Flexibility to install on your schedule
- Sense of accomplishment
What You'll Need
Included in Your AmbientLights Kit
- RGBW LED light strings with waterproof connectors (true white + 16 million colors)
- Color-matched aluminum channels (6 color options)
- Controller with built-in power supply
- Extension wires for jumps between sections
- Waterproof wire nuts and connectors
- Mounting hardware
- Detailed instruction manual
Tools You'll Provide
- Ladder (appropriate height for your roofline)
- Drill with 1/2" bit
- Measuring tape
- Wire cutters/strippers
- Marker or pencil
- Safety equipment (gloves, safety glasses)
- Helper (recommended but not required)
Optional But Helpful
- Laser level for perfectly straight lines
- Extension cord for drill
- Magnetic parts tray
- Headlamp for shadowed areas
Pre-Installation Planning
1. Measure Your Roofline
Option A: Professional Measurement Service
- Use GAF Quick Measure ($30): https://quickmeasure.gaf.com
- Receive detailed roofline measurements in 1-2 hours
- Includes all peaks, valleys, and architectural features
Option B: DIY Measurement
- Sketch your home's outline from above
- Measure each section of roofline
- Add 10% for corners and connection points
- Don't forget: garage edges, bump-outs, covered entries
2. Design Your Layout
Consider these installation zones:
- Primary zones: Front-facing rooflines, main entrance
- Secondary zones: Garage, visible side elevations
- Optional zones: Back of house, architectural features
3. Check Your Electrical
Locate outdoor outlets or plan routes from indoor outlets:
- Most homes need 1-2 outlets total
- Controller handles up to 300 lights (225 feet)
- Plan for future expansion
Step-by-Step Installation Guide
Phase 1: Prep Work (30 minutes)
- Unpack and organize: Lay out all materials, check against packing list
- Test the system: Connect controller and one light string, verify all LEDs work
- Mark starting point: Choose corner nearest to power source
Phase 2: Install First Section (45 minutes)
-
Mount first channel piece:
- Hold channel against fascia/soffit
- Mark screw holes every 3 feet
- Drill pilot holes
- Secure channel with provided screws
-
Install lights in channel:
- Start from one end
- Snap each light into pre-cut holes
- Ensure arrows on lights point same direction
- Leave extra wire hanging for now
Phase 3: Continue Installation (2-3 hours)
-
Work in sections:
- Install 10-foot sections at a time
- Connect channels end-to-end
- Maintain consistent spacing
-
Navigate corners:
- Miter cut channels at 45° for clean corners
- Or use corner connection pieces
- Allow extra wire for smooth turns
-
Handle gaps and jumps:
- Cut light string at designated cut points
- Use provided extension wire for jumps
- Seal cut ends with liquid electrical tape
Phase 4: Complex Areas (1 hour)
Peaks and Gables:
- Work from bottom to peak
- Use level to ensure straight lines
- Consider accent lighting on peak returns
Multiple Stories:
- Install upper levels first
- Run hidden wires through soffit vents
- Use wire clips in low-visibility areas
Obstacles (vents, cameras, etc.):
- Route around with extension wire
- Maintain light spacing appearance
- Hide connections behind downspouts
Phase 5: Final Connections (30 minutes)
-
Connect to controller:
- Run main wire to controller location
- Use weatherproof connections
- Test before final mounting
-
Secure all wiring:
- Use provided clips every 2-3 feet
- Hide wires along architectural lines
- Ensure no dangling sections
-
Program your system:
- Download AmbientLights app
- Connect to WiFi
- Set up favorite colors and patterns
- Test all zones
Common Mistakes to Avoid
❌ Mistake #1: Not Testing Before Installing
Solution: Always test each string before mounting
❌ Mistake #2: Forcing Lights Into Channels
Solution: Lights should snap in easily - if forcing, check alignment
❌ Mistake #3: Ignoring Light Direction
Solution: All arrows must point the same direction for patterns to work
❌ Mistake #4: Over-tightening Channels
Solution: Snug, not tight - channels need slight flexibility
❌ Mistake #5: Poor Wire Management
Solution: Plan wire runs before installing, hide along natural lines
Safety First
Ladder Safety
- Three-point contact rule: Two hands and one foot, or two feet and one hand
- Proper angle: 1 foot out for every 4 feet up
- Never overreach: Move ladder instead
- Helper holds base: Especially on uneven ground
Electrical Safety
- Turn off power: When making electrical connections
- Use GFCI outlets: For all outdoor connections
- Check weather: No installation in wet conditions
- Inspect regularly: Look for damaged wires before/after storms
Personal Safety
- Wear gloves: Aluminum edges can be sharp
- Eye protection: When drilling overhead
- Take breaks: Fatigue leads to accidents
- Stay hydrated: Even in cool weather
Post-Installation Setup
App Configuration
- Download AmbientLights app (iOS/Android)
- Create account and register warranty
- Connect to your WiFi network
-
Explore features:
- 16 million colors
- Pre-programmed holiday themes
- Custom patterns and animations
- Scheduling and timers
- Music synchronization
Recommended Settings
Daily Use:
- Warm white (2700K) at 40% brightness
- Auto on at sunset, off at 11 PM
- Different zones for accent lighting
Holiday Modes:
- Christmas: Classic red/green chase
- Halloween: Orange/purple fade
- 4th of July: Red, white, blue sparkle
- Team colors for game day
Maintenance Schedule
- Monthly: Visual inspection from ground
- Quarterly: Check app for updates
- Annually: Clean channels, check connections
- After storms: Verify all sections working
Frequently Asked Questions
How long does DIY installation really take?
For a typical single-story home (150-200 linear feet), expect:
- First-time installer: 5-7 hours
- With a helper: 4-5 hours
- Second installation: 3-4 hours
What if I need help during installation?
AmbientLights offers:
- Detailed video tutorials
- Email support with 24-hour response
- Phone support during business hours
- Active DIY community forum
Can I install in sections?
Absolutely! Many customers install:
- Year 1: Front of house
- Year 2: Sides and garage
- Year 3: Backyard and accents
How do permanent lights handle weather?
- Rated IP68 (fully weatherproof)
- Operating temperature: -40°F to 140°F
- 50% thicker wiring than competitors
- UV-resistant channels won't fade
What about HOA restrictions?
Permanent lights are often HOA-friendly because:
- Invisible during daytime
- No dangling wires or clips
- Can match home's trim color
- Useful for security lighting year-round
Is the warranty valid for DIY installation?
Yes! Full 5-year warranty covers:
- LED failures (100,000-hour rating)
- Controller malfunctions
- Channel integrity
- Color matching
Ready to Transform Your Home?
You've seen how easy DIY installation can be. In less time than it takes to watch a football game, you can have professional-quality permanent Christmas lights that will last for decades.
Your Next Steps:
Measure Your Roofline Order Your Kit - TodayJoin thousands of homeowners who've discovered the secret to beautiful, hassle-free holiday lighting without the shocking installation quotes.

Leave a comment
All comments are moderated before being published.
This site is protected by hCaptcha and the hCaptcha Privacy Policy and Terms of Service apply.